-
tel:
+86 13482234221 -
email:
andrea.chen@kejian-china.com
The Importance of Flexible Flashing Tape in Tile Roofs
Apr 30, 2025
Introduction
Tile roofs are widely used in various buildings due to their natural aesthetics and excellent drainage performance. However, details such as roof joints, chimney bases, and skylight edges are prone to water leakage. Flexible flashing tape, a highly elastic and aging-resistant waterproofing material, effectively addresses the shortcomings of traditional rigid waterproofing materials and has become a critical component in modern tile roof waterproofing. This article explores its necessity, installation locations, application methods, and core value.
Is Flexible Flashing Tape Necessary for Tile Roofs?
Traditional tile roofs often rely on cement mortar or metal flashing for waterproofing. However, these materials are prone to cracking or corrosion due to long-term thermal expansion, contraction, or structural deformation, leading to frequent leaks. Flexible flashing tape, made of polymer materials (e.g., butyl rubber, modified asphalt), offers the following advantages:
- High Elasticity: Accommodates minor displacements between tiles and structures, preventing cracks.
- Strong Weather Resistance: Resists UV rays, extreme temperatures, and offers a long service life.
- Ease of Installation: Requires no complex tools; can be directly adhered or welded.
Thus, flexible flashing tape not only enhances waterproofing reliability but also reduces long-term maintenance costs, making it an ideal choice for tile roofs.
Where to Install Flexible Flashing Tape on Tile Roofs
Flexible flashing tape should cover all critical leakage-prone junctions (Suggested image: Schematic diagram of roof joints):
- Ridge and Slope Intersections: Prevents rainwater from seeping through ridge gaps.
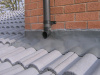
- Chimney and Vent Pipe Bases: Wraps around pipe peripheries to form a continuous waterproof layer.
- Skylight or Gutter Edges: Covers joints between skylights and tiles to avoid water penetration.
- Valley and Wall Connections: Seals gaps between tiles and walls to block rainwater backflow.
How to Apply Flexible Flashing Tape on Tile Roofs
Installation Steps (Suggested image: On-site construction photos):
- Surface Preparation: Clean the installation area, ensuring it is free of dust and grease. Apply a primer if necessary to enhance adhesion.
- Cutting and Positioning: Cut the tape to required lengths, covering joints while leaving a 5–10 cm overlap.
- Adhesion and Fixation: Remove the backing film and press evenly for firm adhesion. Use a heat gun to soften the material in complex areas for better conformity.
- Inspection and Finishing: Roll edges to eliminate air bubbles or lifting, and seal overlaps with waterproof sealant.
The Key Value of Flexible Flashing Tape in Tile Roofs
- Cost-Effectiveness: One-time investment reduces long-term repair expenses.
- Eco-Friendliness: Recyclable material with pollution-free installation.
- Safety: Prevents structural corrosion or mold growth caused by leaks.
- Aesthetics: Concealed installation preserves the roof’s visual integrity.
Conclusion
With its superior performance and flexible installation, flexible flashing tape has become indispensable in modern tile roof waterproofing. Whether for new constructions or renovations, its proper application significantly enhances roof durability and safety. Property owners and contractors should prioritize certified products and conduct regular inspections to maximize waterproofing efficacy.

Recent Posts

October 26, 2016
The Most Successful Engineering ContractorContact US
Product Information
Quantity
Unit
Piece
Support order samples, customization, wholesale direct, and complete payment. If the product you look for does not have corresponding customized content, pls fill out the form below to contact us, and we will reply ASAP.